Purchasing Garlic Seeds (or Bulbs) for Planting: A Comprehensive Guide
Garlic is a beloved staple in kitchens worldwide, valued not only for its robust flavor but also for its numerous health benefits. For those considering embarking on the journey of garlic cultivation, one of the first and most crucial steps is selecting the right seeds or bulbs for planting. This article delves deep into the process, ensuring that you make an informed choice that sets the foundation for a successful garlic harvest.
Understanding the Basics: Seeds vs. Bulbs
First, it’s essential to clarify that garlic does not produce actual “seeds” like some other plants. Instead, garlic is typically propagated using cloves from a garlic bulb. Each clove, when planted, will grow into a new bulb. However, the term “garlic seed” often refers to these cloves or sometimes to whole bulbs that are intended for planting.
Selecting the Right Variety
Garlic comes in a variety of strains, with the most common categories being:
- Softneck Garlic: Known for its softer stalk that can be braided, this type is ideal for regions with milder winters. Softneck garlic typically has a longer shelf life.
- Hardneck Garlic: Recognized by its hard central stalk, this garlic type produces fewer but larger cloves and is suitable for colder climates. It also produces garlic scapes, which are edible flower stalks.
Sourcing Your Garlic
- Certified Suppliers: It’s vital to purchase from certified suppliers who provide disease-free cloves. This ensures a healthy start for your garlic.
- Local Farmers: Sometimes, the best garlic for your region can be sourced right from a local farmer. They might have varieties that are acclimated to your specific area, leading to better growth.
- Avoid Supermarket Garlic: Garlic from supermarkets might be treated to prevent sprouting, making them unsuitable for planting. They might also carry diseases.
Storing Before Planting
If you’re not planting your garlic seeds (cloves) immediately, they should be stored in a cool, dry place. Ideally, they should be kept in a mesh bag to allow for proper air circulation.
Inspecting for Quality
Before planting, inspect each clove. Healthy planting material should be firm to the touch, free from visible mold or damage, and should not have any off or sour odors. Discolored or soft cloves should be discarded.
Conclusion
Purchasing the right garlic seeds (or bulbs) for planting sets the stage for the entire cultivation process. By understanding the different varieties, sourcing from reputable places, and ensuring the quality of each clove, you’re on your way to a successful garlic-growing journey. With careful selection, the result will be robust, flavorful bulbs that are a joy to harvest and consume.
Planting the Garlic: A Step-by-Step Guide to Cultivating This Culinary Staple
Garlic is a multifaceted plant, serving as a fundamental ingredient in various cuisines and revered for its health benefits. Once you have chosen the perfect garlic seeds or bulbs, the next pivotal step is planting. This article will guide you through the process, ensuring you nurture your garlic from a humble clove to a thriving bulb.
1. Choose the Right Time
Hardneck varieties thrive when planted in late autumn, a few weeks before the first frost. This allows them to establish roots before the winter freeze.
Softneck varieties, often preferred in milder climates, can be planted in early spring, but many growers still opt for autumn planting due to the larger bulbs it produces.
2. Prepare the Soil
Garlic favors well-drained soil with a neutral pH. Before planting:
- Till the soil to about 12 inches deep, breaking up large clods.
- Mix in plenty of compost or well-rotted manure. This not only enriches the soil but also aids in drainage.
- Smooth the surface and ensure the bed is level.
3. Space Appropriately
For optimum growth, cloves should be planted:
- About 2 inches deep.
- Spaced 4-6 inches apart within rows.
- Rows should be about 10-12 inches apart.
4. Planting the Cloves
- Separate the garlic bulb into individual cloves. Use the larger cloves for planting as they typically yield bigger bulbs.
- Ensure you plant each clove with the pointy end facing up and the flat end down. This is vital as planting them upside down can hinder growth.
5. Mulching
Once planted, cover the bed with a 3-4 inch layer of mulch. Straw, hay, or leaves work well. Mulch serves a dual purpose:
- It insulates the soil, especially crucial for fall-planted garlic, protecting it from harsh winter temperatures.
- It helps retain soil moisture and suppresses weed growth in spring.
6. Watering
After planting, water the cloves well to help them establish roots. While garlic requires moisture, especially during the growth phase in spring, avoid overwatering, which can lead to rot.
7. Spring Sprouting
For fall-planted garlic, sprouts will appear the following spring. If you planted in the spring, you’d see sprouts within a few weeks, depending on the weather.
Conclusion
Planting garlic requires patience, care, and attention to detail. By ensuring that each step, from soil preparation to the actual planting, is done correctly, you’re setting the stage for a successful harvest. Given the right conditions and care, your garlic will thrive, rewarding you with aromatic bulbs ready for culinary adventures.
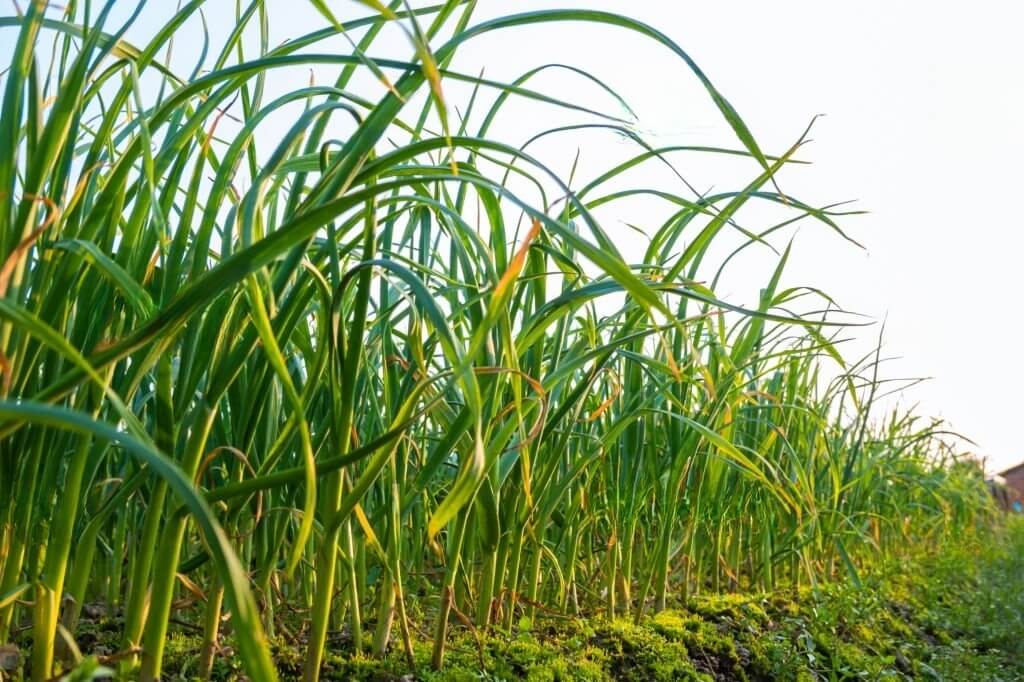
Growing and Maintaining Garlic: Cultivating a Healthy Crop from Sprout to Harvest
Garlic, often dubbed the “stinking rose,” is more than just a kitchen staple. It’s a journey of growth and patience. Once your garlic is in the ground and sprouting, the next phase is ensuring it grows healthily. This article delves into the practices essential for maintaining your garlic, ensuring it reaches its full potential by harvest time.
1. Monitoring Soil Moisture
Garlic has a preference for evenly moist soil. While it’s crucial during the growth phase, especially in spring:
- Water regularly, but avoid waterlogging the soil, which can lead to rot.
- Ensure the soil is well-draining. If the top 1-2 inches of soil feel dry, it’s time to water.
2. Weed Control
Garlic doesn’t compete well with weeds. Weeds can overshadow young garlic plants, competing for essential nutrients and water.
- Regularly hand-pull weeds from the beds to reduce competition.
- If you mulched at the planting stage, it would significantly help suppress weed growth.
3. Nutrient Management
For bountiful bulbs:
- Consider a balanced, slow-release fertilizer at the beginning of the growing season. Avoid high nitrogen feeds, which can promote leaf growth at the expense of bulb development.
- In spring, as the bulbs start to form, consider a potassium-rich feed to promote healthy bulb development.
4. Pest and Disease Watch
While garlic has its natural pest repellents, it’s not immune to all garden pests.
- Watch out for aphids on young plants. These can be washed off with a water jet or controlled using insecticidal soap.
- Rust, a common fungal disease, can affect garlic. If you notice orange pustules on the leaves, consider organic fungicides and improve air circulation.
5. Scapes and Flowering (Hardneck Varieties)
Hardneck garlic varieties produce a central stalk called a scape, which will try to flower.
- Cutting off these scapes can redirect the plant’s energy into the bulb. Plus, scapes are edible and have a mild garlic flavor. They’re excellent in stir-fries or pesto.
6. Preparing for Harvest
As harvest approaches:
- Reduce watering to allow the soil to dry out a bit. This makes the bulbs easier to pull and reduces the risk of them rotting in the ground.
- Keep an eye on the leaves. When the lower ones begin to yellow and wilt, it’s an indication that harvest time is near.
Conclusion
Growing and maintaining garlic requires a balance of diligent care and patient observation. By addressing the plant’s needs throughout its growth cycle, you’re not only ensuring a successful harvest but also cultivating a deeper appreciation for the magic of nature. Come harvest time, the satisfaction of unearthing plump, aromatic bulbs, knowing they’re a product of your dedicated care, is unparalleled.
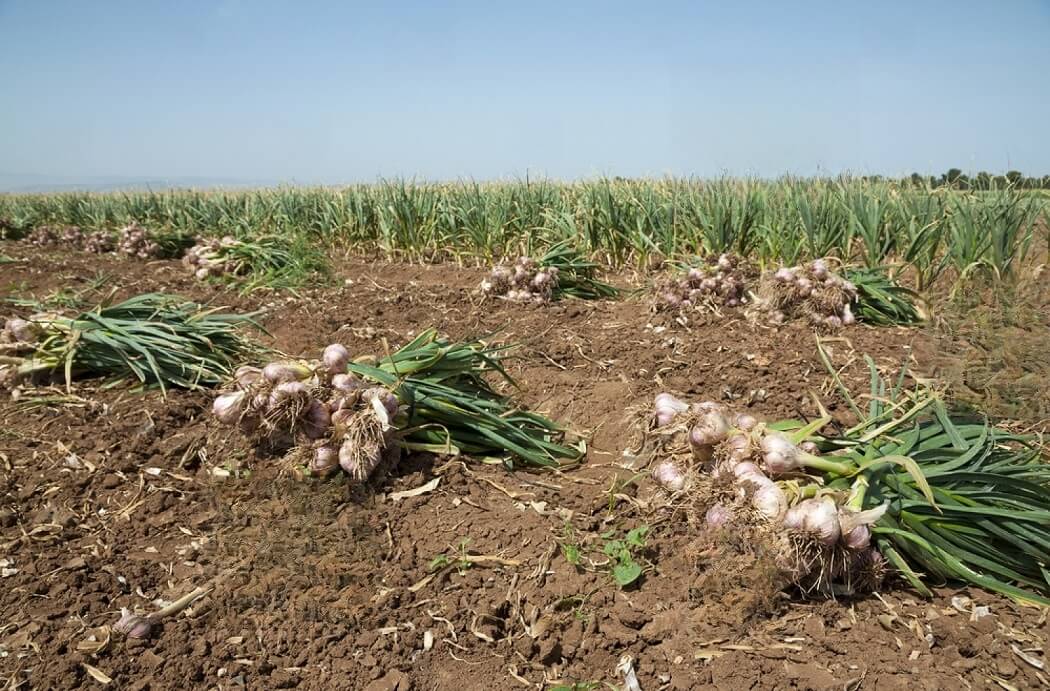
Harvesting the Garlic: Timing, Technique, and Tips for Perfect Bulbs
The culmination of months of patience and care in the garlic cultivation journey is the harvest. When done right, this phase yields plump, aromatic bulbs that are a testament to the grower’s dedication. This article provides a detailed guide on how to best approach the garlic harvest to ensure optimal quality and storage potential.
1. The Right Timing
The age-old question for garlic growers is: “When is the perfect time to harvest?”
- Observe the Leaves: As a general rule, garlic is ready to harvest when the lower third to half of the leaves have turned yellow or brown but the upper part remains green. This usually happens in late spring or early summer, depending on the variety and planting time.
2. Testing a Bulb
If you’re uncertain about the readiness:
- Dig up a test bulb. If the bulb has well-defined, plump cloves and the outer skin is paper-like, it’s time.
3. Gentle Digging, Not Pulling
Resist the temptation to pull the garlic out by the stalk, which can result in damage.
- Use a fork or a spade to gently loosen the soil around the bulbs.
- Dig around the perimeter of the bulb and lift it out, shaking off excess soil. Handle with care to avoid bruising or damaging.
4. Immediate Post-Harvest Care
- Do Not Wash: It’s essential not to wash the bulbs immediately after harvest. Any excess moisture can lead to rot during the drying process.
- Lay Them Out: Arrange the harvested garlic in a single layer in a well-ventilated, shaded area. This initiates the curing process, essential for long-term storage.
5. Curing
Proper curing is crucial for enhancing garlic’s flavor and longevity.
- Hang or lay out garlic in a dry, well-ventilated area away from direct sunlight for 2-3 weeks. This allows the bulbs to dry out and develop the protective papery skin.
6. Cleaning and Trimming
Once cured:
- Gently brush off any remaining soil from the bulbs.
- Trim the roots, leaving about a quarter-inch.
- Depending on your storage preference, you can either trim the stalks or leave them for braiding (especially for softneck varieties).
7. Inspect for Quality
As you prepare your garlic for storage:
- Set aside any bulbs with visible damage, mold, or soft spots. These won’t store well and should be used promptly.
Conclusion
Harvesting garlic is as much an art as it is a science. By paying close attention to visual cues and handling your produce with care, you ensure that the fruits of your labor will be enjoyed for months to come. The joy of unearthing those aromatic bulbs, each a small treasure, is a reward that makes the entire cultivation journey worthwhile.
Drying and Curing the Garlic: Preserving Quality for Longer Shelf Life
Drying and curing garlic post-harvest is not merely a preservation step. This essential process develops the flavors, enhances storage potential, and ensures you reap the full benefits of your gardening efforts. Understanding the nuances of this phase is critical. This article provides a comprehensive guide on drying and curing garlic, ensuring you get the most out of every bulb.
1. Why Cure Garlic?
Curing is the process of allowing garlic to dry in a way that prepares it for storage. Properly cured garlic:
- Develops a strong skin that protects the cloves.
- Increases its shelf life.
- Intensifies its flavor.
2. Initial Drying: Right After Harvest
Immediately after harvesting:
- Lay out the garlic bulbs in a shaded, well-ventilated area. Make sure they’re not exposed to direct sunlight, which can compromise flavor and texture.
- Allow them to dry for a few days, ensuring they are not piled on top of one another.
3. Curing Process
After the initial drying:
- Bundling: Group the garlic in bundles of 5-10 stalks.
- Hanging: Hang the bundles in a well-ventilated, dry location. An airy shed, barn, or even a covered porch can work well. Ensure that the location is away from direct sunlight and potential rain exposure.
- Duration: Allow the garlic to cure for 3-4 weeks. During this period, the outer skins will become papery, and the stems (if left intact) will become thoroughly dry.
4. Checking for Readiness
To determine if the garlic has cured properly:
- Inspect the outer layers of the bulb. The skins should be tight, dry, and papery.
- The roots should feel brittle.
- For hardneck varieties, the stem should be entirely dry.
5. Preparing for Storage
Once cured:
- Trim off the roots close to the base of the bulb.
- If not braiding softneck varieties, trim the stalks to about an inch above the bulb.
- Gently brush off any remaining dirt. Do not wash the bulbs.
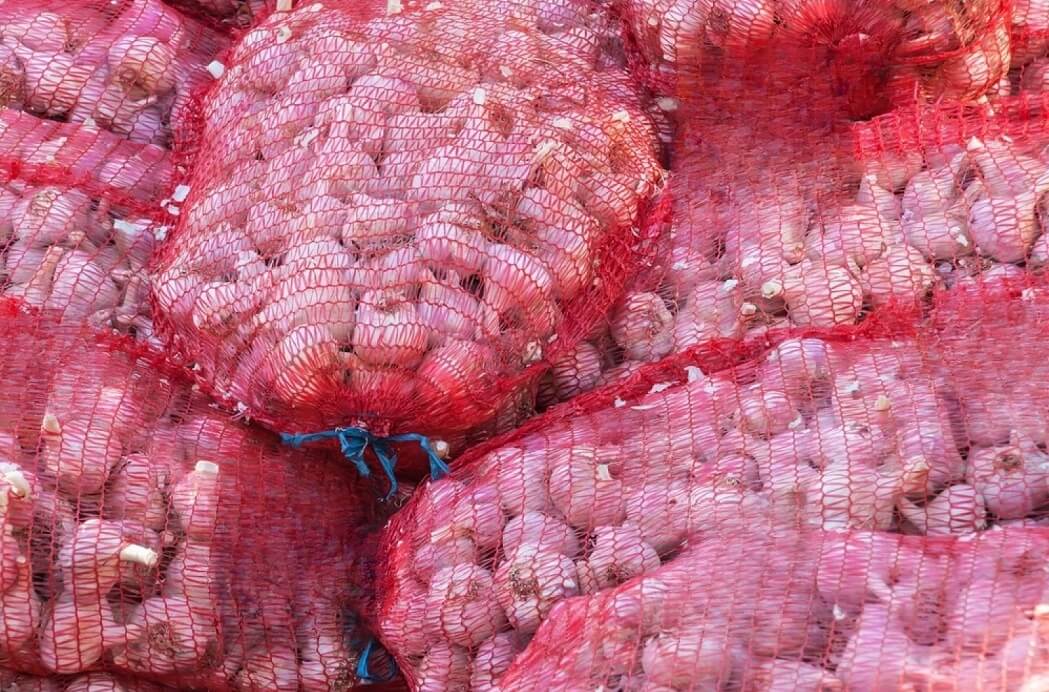
6. Storing Cured Garlic
- Mesh Bags or Baskets: Store the cleaned, cured bulbs in mesh bags or woven baskets. This ensures good air circulation.
- Ideal Conditions: Store in a cool, dry place. Ideal temperatures range between 60-65°F (15-18°C), with moderate humidity.
- Regularly inspect the stored garlic, removing any bulbs that show signs of rotting or sprouting.
Conclusion
Drying and curing garlic might seem like a passive process, but it’s an essential phase that requires attention to detail. By investing time in this stage, you’re ensuring that the flavorful, aromatic bulbs you worked so hard to grow will be ready for your culinary adventures for months to come. Properly cured garlic is a testament to a gardener’s patience and dedication, rewarding you with unparalleled flavor and quality.
Cleaning and Prepping Garlic for Storage: Ensuring Freshness and Flavor
Once you’ve successfully navigated the harvesting and curing process of your garlic, the next crucial phase is preparing it for storage. Proper cleaning and preparation techniques are vital in maximizing the shelf life of your garlic, preserving its aromatic potency, and ensuring it remains free from mold and decay. This article guides you through the essential steps for cleaning and prepping garlic for storage.
1. Assess Your Bulbs
Before you begin the cleaning process:
- Inspect each bulb for signs of damage, soft spots, or any disease. These bulbs won’t store well and should be separated for immediate use.
2. Brushing Off Dirt
- Using a soft brush or even your hands, gently brush off any remaining dirt from the bulbs. It’s essential to be gentle during this process to avoid damaging the protective papery layers that surround the cloves.
3. Trimming
- Roots: Trim off the roots, leaving only about a quarter-inch. This not only helps in better storage but also gives the bulb a cleaner appearance.
- Stems: If you aren’t planning to braid your softneck garlic, or if you’ve grown hardneck varieties, trim the stems to about 1-1.5 inches above the top of the bulb.
4. Additional Cleaning (Optional)
For garlic that you might be gifting or selling:
- Consider using a lightly damp cloth to clean the outermost layer of skin gently. However, it’s essential to make sure you don’t peel away any layers or introduce moisture that can lead to decay.
5. Storing in Batches
- Group your garlic bulbs based on size, if possible. Often, larger bulbs have a slightly shorter storage life than smaller bulbs. By grouping them, you can use them systematically, ensuring none go to waste.
6. Choosing Storage Containers
- Mesh Bags: These allow good air circulation, which is vital in keeping garlic fresh. Bags can be hung in a cool, dry place.
- Baskets: Woven baskets are another excellent option. Lay your garlic in them, ensuring they don’t get too crowded.
- Braids: For softneck garlic, braiding is not just aesthetic but functional. Hang your braids in a dry area with good air circulation.
7. Optimal Storage Conditions
For longevity:
- Store your garlic in a cool, dry place. Ideal temperatures are between 60-65°F (15-18°C).
- Avoid storing in places with high humidity, which can promote sprouting.
- Stay away from sunlight, which can cause your garlic to deteriorate faster.
8. Regular Check-ins
Even with the best care, some bulbs may start to decay or sprout over time.
- Regularly inspect your stored garlic, removing any bulbs that appear to be past their prime or show signs of sprouting.
Conclusion
The cleaning and storage preparation process is the final checkpoint in ensuring that your garlic remains flavorful and ready for use in the months to come. Investing time and care in this phase means you’ll always have fresh, home-grown garlic on hand to elevate your culinary creations.
Selling the Garlic: Tips for a Successful Garlic Business
Entering the market with your home-grown garlic can be an exhilarating experience, blending the joys of gardening with the thrills of entrepreneurship. While garlic is a popular staple in kitchens worldwide, selling it requires strategy, market understanding, and a touch of creativity. This article provides insights into successfully selling your garlic, ensuring you get the best returns for your hard work.
1. Understand Your Product
- Variety Matters: Different garlic varieties have unique flavors, sizes, and storage capabilities. Make sure you know the selling points of your specific variety.
- Certifications: If you’ve grown your garlic organically or followed specific cultivation practices, consider getting certifications. This can add value to your product.
2. Market Research
- Local Preferences: Understand the preferences of your local community. Are they inclined towards organic produce? Do they prefer a specific garlic variety?
- Competitive Pricing: Check the prevailing garlic prices in your area. Ensure your pricing is competitive, considering factors like quality, size, and cultivation practices.
3. Quality Presentation
- Clean and Neat: Ensure your garlic is well-cleaned, with trimmed roots and stems. Presentation can significantly influence buyer decisions.
- Packaging: While garlic needs ventilation, consider packaging options that display the product well, such as mesh bags with labels.
4. Branding and Marketing
- Storytelling: Share your garlic-growing journey. Today’s consumers love to know where their food comes from and the story behind it.
- Labels: Design attractive labels that include the garlic variety, weight, and any other unique selling points.
- Online Presence: Consider creating a website or social media pages dedicated to your garlic business. Share photos, cultivation practices, and customer testimonials.
5. Diversify Your Offerings
- Selling Scapes: If you’ve grown hardneck garlic, consider selling the scapes. They’re a gourmet product in many markets.
- Value-added Products: Think about producing garlic-infused oils, garlic powders, or even pickled garlic. These can attract a broader audience and provide additional revenue streams.
6. Find the Right Selling Platforms
- Farmers’ Markets: A classic choice for local growers. Interacting directly with customers allows for feedback and building a loyal customer base.
- Local Grocery Stores: Partner with local grocery stores or organic shops.
- Online Platforms: Websites like Etsy or even dedicated food marketplaces can be a platform for selling your garlic or garlic-based products.
7. Customer Feedback
Always be open to feedback. It can provide insights into:
- Potential improvements.
- New product ideas.
- Market needs and gaps.
8. Building Relationships
Networking is key:
- Collaborate with local chefs or restaurants. They often seek fresh, high-quality produce.
- Connect with local farming communities or co-ops for insights, bulk sales opportunities, or collaborative ventures.
Conclusion
Selling garlic goes beyond merely trading bulbs for money. It’s about sharing a piece of your garden, your passion, and your dedication with the world. With the right strategies, you can ensure that your garlic finds its way into many kitchens, adding flavor to dishes and joy to your entrepreneurial journey.
FAQ: Garlic from Seed to Sale
1. Can I start garlic from seeds? While garlic is typically grown from cloves, it can also be propagated from true seeds. However, this method is less common as it’s more complex and time-consuming.
2. When is the best time to plant garlic? Garlic is best planted in the fall, a few weeks before the first hard frost. This allows the garlic to establish roots before winter.
3. How deep should I plant garlic cloves? Plant cloves pointy-end up, about 2 inches deep in well-draining soil.
4. How often should I water my garlic plants? Garlic prefers consistent moisture. Water regularly but ensure the soil isn’t waterlogged. In the weeks leading up to harvest, reduce watering to avoid mold or rot.
5. When do I know my garlic is ready for harvest? When the lower leaves turn brown, but several of the top leaves remain green, it’s time to harvest. This typically happens in late spring to early summer.
6. Why is curing garlic important? Curing garlic helps to dry it out, improving storage life and intensifying flavor. It also prevents mold and decay.
7. How long should I cure garlic before storage? Garlic should be cured for approximately 3-4 weeks in a well-ventilated, dry area, away from direct sunlight.
8. How should I store cured garlic? Store garlic in a cool, dry place, ideally between 60-65°F (15-18°C). Use mesh bags or woven baskets to ensure proper air circulation.
9. Can I sell garlic scapes? Absolutely! Garlic scapes, especially from hardneck varieties, are a gourmet product and can be sold alongside your garlic bulbs.
10. How do I determine the price for selling my garlic? Conduct market research to understand local preferences and current pricing. Factor in your garlic’s variety, cultivation practices, and any certifications you might have.
11. Are there regulations for selling garlic? Regulations can vary based on region. It’s essential to check with local agricultural departments or organizations to ensure compliance.
12. When is garlic harvested? Garlic is typically harvested in late spring to early summer, when the lower leaves turn brown but several top leaves remain green.
13. Where is garlic from? Garlic is native to Central Asia but has been cultivated and used worldwide for thousands of years.
14. How many garlic plants can I grow per square foot? It’s recommended to plant about 4-6 garlic plants per square foot, ensuring enough space for each plant to grow.
15. How do I start farming garlic? Begin with well-draining soil, choose the right garlic variety, plant in the fall, and maintain consistent moisture. Periodic inspections for pests and disease will ensure a healthy crop.
16. Where does garlic come from originally? Garlic is believed to have originated in Central Asia.
17. In what regions does garlic grow best? Garlic grows in a variety of climates but prefers areas with cold winters and long, sunny days during its growing season.
18. Is garlic farming profitable? Yes, garlic farming can be profitable, especially with high-demand varieties or organic practices. Market research and strategic selling can maximize profits.
19. How much garlic should I feed horses? Typically, 1-2 cloves of fresh garlic or 15-30 grams of garlic granules/powder per day for an average-sized horse is recommended. Always consult with a veterinarian.
20. Why should I plant garlic in the fall? Fall planting allows garlic to establish roots before winter, leading to larger bulbs during the harvest season.
21. How many garlic plants can I fit per acre? With spacing of 4-6 plants per square foot, you can fit about 174,000-261,000 plants per acre.
22. How can I accelerate garlic growth? Ensuring optimal soil conditions, consistent watering, and using organic fertilizers can promote faster growth. However, garlic generally requires its natural growth period.
23. How profitable is garlic farming? Garlic farming can be highly profitable, especially when tapping into niche markets, using organic practices, or producing value-added products.
24. What garlic variety should I plant? Choose based on climate and desired flavor. Hardneck varieties are best for colder climates, while softneck varieties are versatile and store longer.
25. Who owns the Garlic Farm on the Isle of Wight? The Garlic Farm on the Isle of Wight is owned by the Boswell family.
26. How much garlic can I get from one plant? One garlic plant, grown from a clove, will produce a bulb which can contain between 10 to 20 cloves, depending on the variety and growing conditions.
27. How often should I feed my garlic plants? Garlic plants can benefit from occasional feeding with a balanced organic fertilizer. Avoid high-nitrogen fertilizers which can lead to excessive leaf growth at the expense of bulb size.
28. How do I start garlic farming? Select a site with full sun and well-draining soil, prepare the soil with compost, choose the right variety based on climate, plant cloves in the fall, and maintain them through their growth period.
29. How can I farm garlic in Kenya? In Kenya, garlic prefers cooler regions like Rift Valley. Use well-drained, fertile soil, and plant during the cooler months. Regular watering and pest control are crucial.
30. How can I farm garlic in South Africa? Garlic in South Africa is typically planted in March-April in well-drained soil, with regular watering. Ensuring the right spacing and pest control is vital.
31. When do garlic plants flower? Garlic plants produce a flower stalk or “scape” in late spring or early summer. Removing this can help the plant focus energy on bulb development.
32. Where does most garlic come from in the US? Most of the garlic in the US is grown in California, particularly in Gilroy, which is known as the “Garlic Capital of the World”.
33. Where is the Garlic Farm located on the Isle of Wight? The Garlic Farm is located in Newchurch on the Isle of Wight.
34. Which garlic variety should I plant? Your choice should depend on climate and desired flavor profile. Softneck varieties are versatile and store well, while hardneck types offer unique flavors and produce scapes.
35. Who sells Garelick Farms milk? Garelick Farms milk is available in many grocery stores in the Northeastern United States. You can find it at major chains and local shops alike.
36. Why does garlic make you fart? Garlic contains natural sugars and fibers that can ferment in the digestive tract, producing gas. This can lead to bloating and flatulence in some individuals.
37. Why is garlic associated with repelling vampires? The association comes from Eastern European folklore, where garlic was believed to ward off evil spirits, including vampires, due to its pungent aroma and medicinal properties.
38. How does garlic grow? Garlic grows from cloves. Each clove planted in soil develops into a full garlic bulb under the right conditions.
39. When is the best time to plant garlic in the UK? In the UK, garlic is best planted in autumn, preferably in October or November.
40. Where is the best place to grow garlic in a garden? Garlic prefers a sunny location with well-draining soil.
41. How long does it take for garlic to mature? Typically, garlic takes 7-9 months from planting to be ready for harvest.
42. How does garlic grow in pictures? This is better explained through a visual guide. Many gardening websites and books offer step-by-step images.
43. When should I plant garlic in Melbourne? In Melbourne, plant garlic in late autumn, typically around April or May.
44. What’s the best planting time for garlic in Texas? In Texas, it’s recommended to plant garlic between October and November.
45. How does garlic develop from a single clove? When a clove is planted, it develops roots and begins forming a new bulb, made up of multiple cloves.
46. When is wild garlic typically seen? Wild garlic grows in spring, with flowers often appearing between April and June.
47. When to plant garlic in Florida? In Florida, plant garlic between October and November.
48. What does garlic grow on? Garlic grows underground as bulbs, developing from individual cloves.
49. Where does garlic thrive the most? Garlic prefers temperate climates with cold winters. It thrives in well-drained soil under full sun.
50. How much garlic should I plant per acre? Considering an average spacing of 4-6 plants per square foot, you’d plant about 174,000-261,000 cloves per acre.
51. When planting garlic, should I peel it? No, do not peel the garlic cloves before planting. The papery skin protects the clove.
52. How many new cloves does one garlic clove produce? A single clove can produce a full garlic bulb, which can contain between 10 to 20 cloves, depending on variety and conditions.
53. How can I cultivate garlic at home? Choose a sunny spot, use well-draining soil, plant cloves pointy end up about 2 inches deep, and water regularly.
54. How does garlic grow from a bulb? The individual cloves of a garlic bulb, when planted, each grow into a new bulb.
55. Which plants complement garlic in a garden? Garlic pairs well with tomatoes, carrots, and roses, but should be kept away from peas and beans.
56. In what type of climate does garlic grow best? Garlic prefers a temperate climate with cold winters for vernalization.
57. Where is the majority of garlic grown? China is the largest garlic producer, followed by countries like India, Bangladesh, and Egypt.
58. Why didn’t my garlic mature? Possible reasons include planting at the wrong time, inadequate soil nutrients, insufficient water, or lack of vernalization.
59. How does garlic growth progress underground? Garlic roots extend from the base of the clove, which then forms a bulb consisting of multiple cloves. It’s a tuberous root system.
60. When is garlic planting time in Sydney? In Sydney, plant garlic around March to May.
61. How does garlic grow indoors? Use pots with good drainage, place them in a sunny location, and water regularly. Consider using a grow light in low-light conditions.
62. Which garlic variety is superior for cultivation? This depends on regional conditions and personal preference. Hardneck varieties have richer flavors, while softneck varieties store longer.
63. What aids garlic growth? Loamy, well-drained soil, full sun exposure, and consistent watering promote healthy garlic growth.
64. Why are my garlic bulbs small? Potential causes are overcrowded planting, lack of nutrients, insufficient water, or planting non-vernalized garlic in warm climates.
65. When is the best time to plant garlic in the UK? In the UK, garlic is best planted in autumn, ideally between October and November, though spring planting is also possible for certain varieties.
66. Where can I buy garlic for planting? Planting garlic can be purchased from local nurseries, gardening centers, or reputable online seed and gardening suppliers.
67. When should garlic be planted in Ontario? In Ontario, garlic is typically planted in the fall, around October, to allow it to establish roots before winter.
68. What’s the optimal planting time for garlic in Australia? In most parts of Australia, garlic is planted in late autumn, typically around April or May.
69. After planting, how many months does it take to harvest garlic? Garlic usually takes about 7-9 months to mature and be ready for harvest, depending on the variety and growing conditions.
70. How does a garlic plant look? Garlic plants have long, slender, flat, green leaves growing upright from a central stem. As the plant matures, the lower leaves will start to brown.
71. How close together should I plant garlic cloves? Garlic cloves should be planted about 4-6 inches apart to give them enough space to develop into full bulbs.
72. How many garlic bulbs does each planted clove produce? One planted garlic clove will produce one garlic bulb, which can contain anywhere from 10 to 20 cloves, depending on the variety.
73. How often should I water my garlic plants? Garlic prefers consistent moisture. Water regularly, but ensure the soil is well-draining to prevent waterlogging.
74. How much garlic should I plant in my garden? This depends on your consumption. Each clove will produce one bulb, so consider how much garlic your household consumes in a year when deciding how many cloves to plant.
75. How much garlic should each person plant for personal consumption? On average, a person might consume around 3-5 pounds of garlic a year. Considering each bulb can weigh about 0.1-0.25 pounds, planting 15-50 cloves per person is a general guideline.
76. How many days does it take for garlic to be ready for harvest after planting? Garlic generally takes between 210 and 270 days (7-9 months) from planting to be ready for harvest.
77. Where can I buy a garlic plant? Garlic plants or seedlings can be purchased from local nurseries, garden centers, and online gardening retailers.
78. Where’s the best spot to plant garlic chives? Garlic chives prefer full sun to partial shade and should be planted in well-draining soil.
It’s worth noting that the specifics for planting and caring for garlic can vary based on local conditions, so always refer to regional guidelines or local expert advice for the best results.
This FAQ provides a quick overview for both growers and sellers.